📖 JPA 와 레포지토리
데이터를 저장하려면, DB에 넘겨야 한다. 하지만 직접 데이터를 넘기기가 쉽지 않다. 왜냐하면 서버와 DB가 사용하는 언어가 서로 다르기 때문이다. 스프링의 경우 서버는 자바를 사용하고 DB는 SQL을 사용하기 때문에 서로의 언어를 이해할 수 없다.
이를 위한 라이브러리가 JPA이다. JPA는 DB와이 소통을 보다 쉽게 해 준다.
그 핵심이 되는 인터페이스를 레포지토리(repository)라 한다.
레포지토리가 DB와 데이터를 주고 받으려면, 알맞은 규격이 필요하다. 이를 엔티티(entity)라고 한다.

📖 DB 테이블과 레코드
DB는 데이터를 테이블(table)로 관리한다. 엑셀이라 생각하면 쉽다. 리파지터리에서 엔티티 객체를 보내면, 이를 받아 테이블에 저장한다. 이렇게 엔티티가 테이블로 저장된 것을 레코드(record)라 한다.
사용 파일
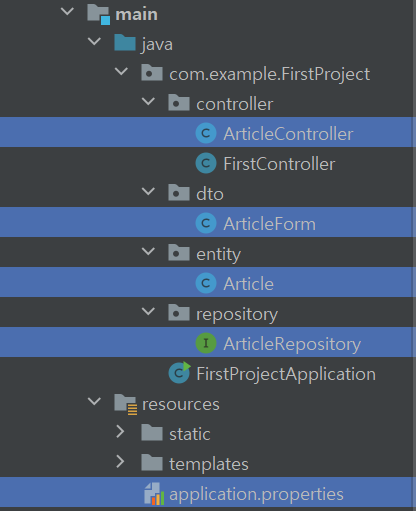
레포지토리(repository)
1) 인터페이스 생성 : “repository/ArticleRepository”
package com.example.FirstProject.repository;

import com.example.FirstProject.entity.Article;
import org.springframework.data.repository.CrudRepository;

// 우리가 ArticleRepository(레포지토리)를 직접 구현할 수도 있지만
// JPA 에서 제공하는 CrudRepository 인터페이스를 활용해 쉽게 만들어 보겠다.
// CrudRepository 를 상속받는다
public interface ArticleRepository extends CrudRepository<Article, Long> {  // <관리대상 entity, 대표값 타입>

}
우리가 ArticleRepository(레포지토리)를 직접 구현할 수도 있지만
JPA 에서 제공하는 CrudRepository 인터페이스를 활용해 쉽게 만들 수 있다.
엔티티(entity) 클래스
2) 클래스 생성 : “entity/Article”
package com.example.FirstProject.entity;

import javax.persistence.Column;
import javax.persistence.Entity;
import javax.persistence.GeneratedValue;
import javax.persistence.Id;

@Entity // @Entity 를 붙여주어야 DB가 해당객체를 인식가능
public class Article {

    @Id //DB가 해당 객체를 인식 가능!
    @GeneratedValue // 1,2,3... 자동생성 어노테이션
    private Long id;

    @Column
    private String title;

    @Column
    private String content;

    public Article(Long id, String title, String content) {
        this.id = id;
        this.title = title;
        this.content = content;
    }

    @Override
    public String toString() {
        return "Article{" +
                "id=" + id +
                ", title='" + title + '\'' +
                ", content='" + content + '\'' +
                '}';
    }
}- @Entity 를 통해 DB가 해당 객체를 인식하여 이 클래스가 DB에 저장될 클래스임을 인식한다.
- @Id 를 통해 DB에서는 PK로 불리는 것으로 해당 객체를 인식하게 해주는 것이다. 사람으로 따지면 주민등록번호 같은 것으로 생각하면 편하다.
- @GeneratedValue 는 Id 값을 자동으로 관리하게 해주는 것이다. 매 생성 시 1,2,3... 순으로 증가한다.
DTO 클래스
3) toEntity 메소드 추가 "dto/ArticleForm"
package com.example.FirstProject.dto;

import com.example.FirstProject.entity.Article;

public class ArticleForm {

    private String title;
    private String content;

    public ArticleForm(String title, String content) {
        this.title = title;
        this.content = content;
    }

    @Override
    public String toString() {
        return "ArticleForm{" +
                "title='" + title + '\'' +
                ", content='" + content + '\'' +
                '}';
    }

    public Article toEntity() {
        return new Article(null, title, content);
    }
}
public Article toEntity() 를 통해 엔티티 클래스에 있는 필드 값들을 리턴해준다.
컨트롤러
3) 레포지토리에게 데이터를 저장하게 함 "controller/ArticleController"
package com.example.FirstProject.controller;

import com.example.FirstProject.dto.ArticleForm;
import com.example.FirstProject.entity.Article;
import com.example.FirstProject.repository.ArticleRepository;
import org.springframework.beans.factory.annotation.Autowired;
import org.springframework.stereotype.Controller;
import org.springframework.web.bind.annotation.GetMapping;
import org.springframework.web.bind.annotation.PostMapping;

@Controller
public class ArticleController {

    @Autowired // 스프링 부트가 미리 생성해놓은 객체를 가져다가 자동연결!
    private ArticleRepository articleRepository;

    @GetMapping("/articles/new")
    public String newArticleForm(){
        return "articles/new"; //templates 를 기준으로 경로를 적어준다.
    }

    @PostMapping("/articles/create")  //post 방식으로 /articles/create 요청이 들어오면, 아래의 메소드 실행
    public String createArticle(ArticleForm form){  //폼 태그의 데이터가 ArticleForm 객체로 만들어 진다
        System.out.println(form.toString()); // ArticleForm 객체 정보를 확인!

        // 1. DTO 를 Entity 로 변환!
        Article article = form.toEntity();
        System.out.println(article.toString());

        // 2. Repository 에게 Entity 를 DB 안에 저장하게 함!
        Article saved = articleRepository.save(article);
        System.out.println(saved.toString());
        return "";
    }
}
원래 자바에서는 객체를 만들어 주려면 new ArticleRepository() 이런 식으로 객체를 만들어 주어야 하는데
스프링 부트에서는 @Autowired 를 이용해 미리 생성해 놓은 객체를 가져다가 자동으로 연결해준다.
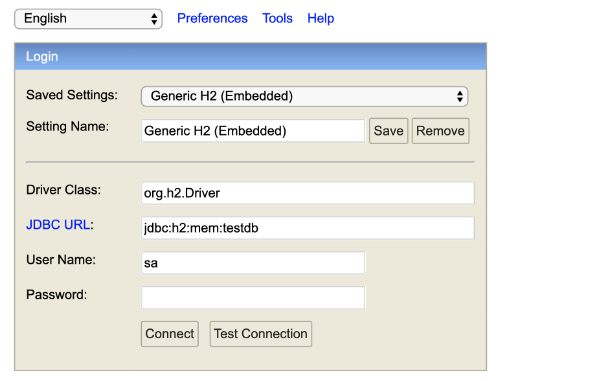
🙆♂️ 확인하기
1)h2 콘솔 확인
접속 안될 시, 서버 로그에서 해당 정보를 찾아 접속 url 정보를 수정!
2)데이터베이스 레코드 조회
- SELECT * FROM ARTICLES;
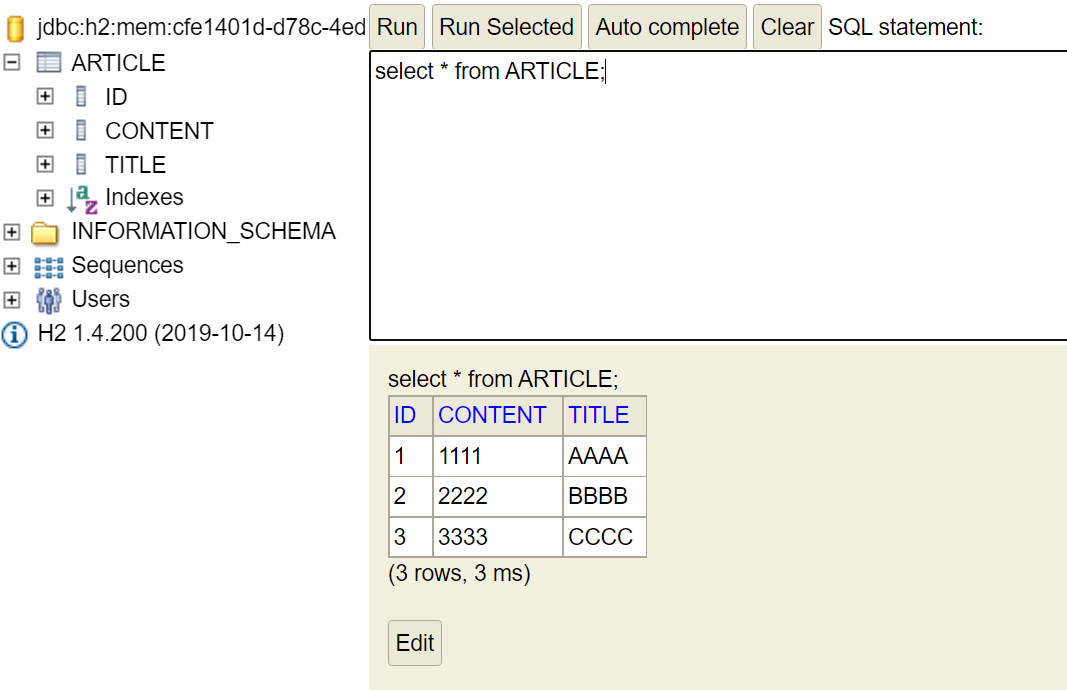
입력한 데이터가 잘 저장된 것을 확인할 수 있다.
(위 내용은 홍팍의 스프링 강의를 보고 정리한 글입니다)
'Spring' 카테고리의 다른 글
| 간단한 API 작성 (0) | 2021.07.21 |
|---|---|
| 롬복(Lombok) 과 리펙토링(Refactoring) (0) | 2021.07.21 |
| 폼 (form) 데이터 주고 받기 (0) | 2021.07.16 |
| 뷰 레이아웃 (0) | 2021.07.16 |
| 뷰 템플릿과 MVC 패턴 (0) | 2021.07.15 |